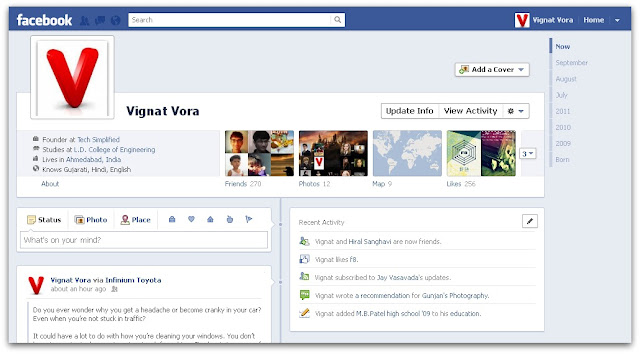
It has been written a lot about Facebook’s continuous efforts in social networking world to completely wipe out its competitors. They have recently launched Subscribe button, ticker and much more. The whole layout of User interface has been changed completely in last couple of weeks. Yesterday, there was f8 event at San Francisco, for such developments. Here, yet another cool feature has been released, which is named as timeline.
According to Facebook, timeline tells the whole story of a user’s life, year wise. The old profile of Facebook is changed with timeline.
According to Facebook, timeline tells the whole story of a user’s life, year wise. The old profile of Facebook is changed with timeline.

Here are some features of this Timeline:
Timeline Cover:
It is a large, open space where you can put an image of your choice, similar to Twitter background Image. This cover is placed at the top of your timeline.
Timeline stories:
With timeline stories, you can share and highlight posts, according to their importance in your life. Here, your friends can view the maps of places, where you have checked-in. They can get your complete information from this part. However, it will be shown with user-desired privacy settings. Here you can check-in to places, edit your relationships and update about your experiences.
Timeline Apps:
It is the coolest feature of the timeline. Here, your activities about check-ins, relationships and your application activities will be shown to your others, according to privacy settings, exercised by you. Here, your various application activities (e.g. games) can also be seen
These are the basic three features of timeline.
In addition to these features, your timeline visitor will be able to see every story, linked to your profile (Earlier stories). One can also see the date, when you joined Facebook.
The latest timelines are categorized in months where the old ones are categorized in years.
These timelines tell your complete story from your birth till date. In the initial stage, your timelines will be shown to you only.
How to enable Facebook Timeline:
1.Log-in to your Facebook account.
2.If you haven’t entered in developer mode, just type developer in Facebook search box, click on the app with highest users.
3.Click on Allow button in dialog box.
4.Go to Facebook developer app
5.Create a new app. Give the desired name of app and its namespace.
6.Now, open the main settings page of your app. It is generally located on the top of your page.
7.In the open graph header click on the “Get Started using open graph” link.
8.Create a test action for your app as shown below.
9.Wait for 2-3 minutes
10.Go to your Facebook home screen. An invite for timeline will be shown to you.
Enjoy such cool features with Facebook.
If you need any kind of help/support, please feel free to comment.
If you liked this post, please share it!!!


No comments:
Post a Comment